©CustomCreationsPhotography
Hey guys, I am Talha Aurangzeb, I love Adobe Photoshop. Welcome To https://uk.fiverr.com/talhaaurangzeb, you can design your logos, posters and cartoon etc with only $5-$10. Thanks for visiting, must like and share my page.
Tuesday, 4 October 2016
Sunday, 7 August 2016
Insta Photography Profile
I'm on Instagram as @zebsphotographs. Install the app to follow my photos and videos. https://instagram.com/download/?r=3635606921
Thursday, 7 July 2016
Tutorial# 02 (Vector Art)
SETTING UP IMAGE:
First you need to choose the image that you are going to vector. Make sure you REALLY like the photo that you are starting with. You are going to be looking at this image for hours and essentially your vector image will be similar to this photo. Lots of people do vectors of their favourite musicians and actors as a sort of tribute. I think this is a great idea because hopefully it motivates you to actually finish the thing and do a good job. Just be careful when you are selecting the image that you are going to vector…it must be a decent size so that you can zoom in and still see lots of detail. Anything smaller than 600 x 600 pixels isn’t going to be much good at all.
First you need to choose the image that you are going to vector. Make sure you REALLY like the photo that you are starting with. You are going to be looking at this image for hours and essentially your vector image will be similar to this photo. Lots of people do vectors of their favourite musicians and actors as a sort of tribute. I think this is a great idea because hopefully it motivates you to actually finish the thing and do a good job. Just be careful when you are selecting the image that you are going to vector…it must be a decent size so that you can zoom in and still see lots of detail. Anything smaller than 600 x 600 pixels isn’t going to be much good at all.
STEPS:
Open your image in Photoshop and duplicate the background layer twice.
Turn off the visibility of top copy.
Working on the middle copy desaturate it (Ctrl + Shft + U)
Next Posterize this layer. Image >> Adjustments >> Posterize…
Set the level to approximately 9 and click OK.
Rename this layer “Posterized”
Turn off the visibility of top copy.
Working on the middle copy desaturate it (Ctrl + Shft + U)
Next Posterize this layer. Image >> Adjustments >> Posterize…
Set the level to approximately 9 and click OK.
Rename this layer “Posterized”
Your layer palette should now look like the one shown above.
The posterized layer is only there as a rough guide for when you get stuck. (Personally I always find the nose to be a little difficult and use the posterize layer to help me). Please please please don’t use it to create your vector. If you do, your resulting image will be BLAND, BORING and LACK ANY ARTISTIC MERIT!
Turn the visibility ON for the “Background copy”. This way you will just see the path and colour won’t get in the way.
Create a new layer (Ctrl + Shft + N)
Make sure it sits below the “Background Copy”
Select the mid tone shade for skin. Grab the pen tool making sure it is set to create Shape Layers (see image below). Trace around the face making sure that you close the path.
Make sure it sits below the “Background Copy”
Select the mid tone shade for skin. Grab the pen tool making sure it is set to create Shape Layers (see image below). Trace around the face making sure that you close the path.
Once a shape layer is complete I like to turn ON and OFF the visibility of top “background copy” layer just to compare the two. Your layer palette should look the image shown below. Notice that I like to lock layers once I am happy with them so that I don’t accidentle move them.
Trace the outline the hair. As a rule you should make the initial shade (the base colour) for the hair the darkest. You will then build up layers of lighter and lighter colours/shades from there.
Once you are happy with the layer, put it into a set called “hair” and lock it. I like to be organised so rather than naming every new layer in a vector I like to organise them into sets…like “hair set”, “eyebrow set”, “sleeve set’ etc.
Once you are happy with the layer, put it into a set called “hair” and lock it. I like to be organised so rather than naming every new layer in a vector I like to organise them into sets…like “hair set”, “eyebrow set”, “sleeve set’ etc.
From the image below, you can see that I have blocked out all the main shapes and organised my layer palette.
 |
| That's the pic!!! |
Tutorial # 01 (By: Talha Aurangzeb)
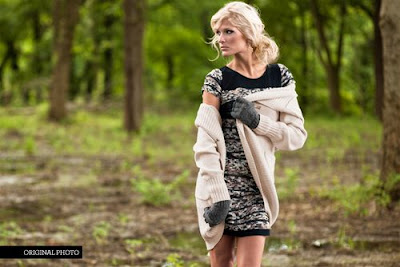 |
| Original Photo (Spring) |
STEP# 02: Go to your Layers palette and create a new Adjustment Layer > Hue/Saturation.
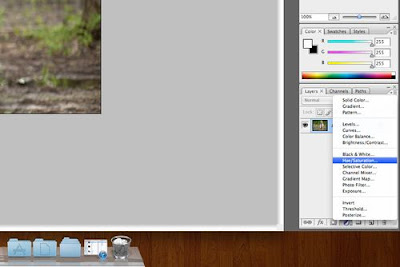 |
| Step# 02 |
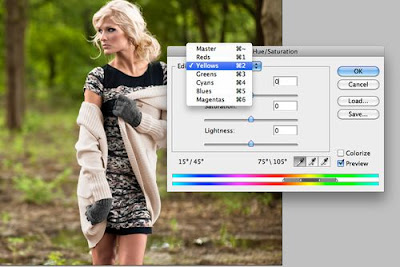 |
| Step# 03 |
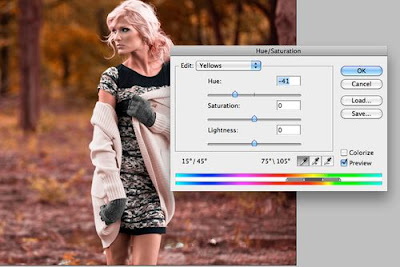 |
| Step# 04 |
Because you created an Adjustment Layer we can "mask" out the effect and restore the natural color to her skin and to her hair. If your not familiar with layer masks they are pretty powerful. On your Hue/Saturation Adjustment Layer go to your paint brush and using a black color start painting in the areas that you want to restore the natural color. See? You are now masking out the effect in the local areas that you paint black. Whoops did you mask out too much? Switch from black to white and with white you can paint back in the effect. You may want to zoom in to be precise.
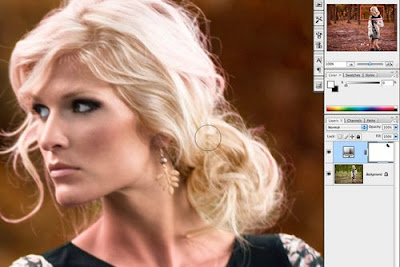 |
| Step# 05 |
Step# 06: That's it!
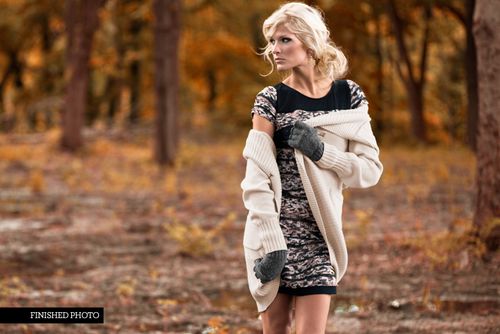 |
| Edited Version (Autumn) |
Thanks for visiting, Must Like and Share and Follow!!!!!
Saturday, 2 July 2016
Logo Designs
Subscribe to:
Comments (Atom)


